# Configuring multi-factor authentication
**Multi-factor authentication (MFA)** adds an extra layer of security to OpenIAM. Users must provide more than a username and password. This reduces the risk of unauthorized access when credentials are compromised.
This guide covers the basic steps to configure MFA and enable it for users.
Use the guides in this section for method-specific setup:
* [Configuring OTP provider](/configuring-multi-factor-authentication/configuring-otp-provider.md)
* [Mailbox configuration](/configuring-multi-factor-authentication/mailbox-configuration.md)
* [FIDO2 authentication](/configuring-multi-factor-authentication/fido2-authentication.md)
* [Adaptive authentication](/configuring-multi-factor-authentication/adaptive-authentication.md)
### Prerequisites
Before you configure MFA, make sure:
* OpenIAM is [installed](/installing-openiam.md) and running.
* You have **administrative access** to the Webconsole.
* SMTP (email) or SMS gateway settings are configured.
* Users have valid contact information (email or phone number).
All OpenIAM deployments need at least one [content provider](/getting-started/concepts.md#content-provider). In most deployments, a content provider is created during installation. Before you continue, confirm that the target domain already has one.
After that, complete the steps below.
{% stepper %}
{% step %}
### Open or create the authentication policy
Sign in to the OpenIAM Webconsole as an administrator. Go to **Security → Authentication Policies**. Open the policy you want to update, such as **Default Authentication Policy**, or click *Create new authentication policy* in the sidebar. The image below shows the new authentication policy screen.
Use the common fields below as a reference. Some fields depend on your authentication source and provider type.
| Parameter name | Description |
| ------------------------------------ | ---------------------------------------------------------------------------------------------------------------------------------------------------------------------------------------------------------------------------------------------------------------------------------------------------------------------- |
| Authentication Custom Handler Script | Specifies a custom Groovy script used to extend or override the default authentication logic. This script allows administrators to implement custom authentication workflows—for example, performing additional validations, integrating with external systems, or applying specific business rules during user login. |
| Auto unlock time | Time in minutes when a locked account will automatically unlock. |
| Failed auth count | Number of times where a consecutive authentication failure will lock the account. |
| Fail URL | External URL where the user will be redirected after failed authentication attempts. This URL overrides default behavior and is not normally necessary. |
| Protocol | Communication protocol: CLEAR, SSL, TLS. It is an important parameter that indicates which protocol is used at the back end to authenticate. |
| Success URL | External URL where the user will be redirected after successful authentication. This URL overrides default behavior and is not normally necessary. |
| Token issuer | Name of the entity that issued the token. |
| Token life | Duration of the token session expressed in minutes. |
| {% endstep %} | |
{% step %}
### Configure MFA methods in the authentication provider
Go to **Webconsole → Access Control → Authentication providers**. Search for the provider in **Authentication Provider Search**. To use the default provider, open **Default OpenIAM Auth Policy**. To use a custom provider, search for it and click **Edit**.
Enable the OTP delivery methods that you want to support:
* **Supports SMS One-Time Password** — sends the OTP by SMS.
* **Supports Email One-Time Password** — sends the OTP by email.
* Enable both if you want to support both delivery methods.
Configure [Mailbox configuration](/configuring-multi-factor-authentication/mailbox-configuration.md) and the [OTP provider](/configuring-multi-factor-authentication/configuring-otp-provider.md) before you continue.
{% endstep %}
{% step %}
### Open the URL pattern
After you configure the authentication provider, choose the URL pattern that should require OTP. Open the relevant content provider, as described in [Linking an authentication provider to a content provider](#linking-an-authentication-provider-to-a-content-provider). Then scroll to **URL patterns** and click **Edit** for the required entry.
{% endstep %}
{% step %}
### Add the TOTP authentication rule
Click `+` in the *Support authentication levels* field. Then add the **TOTP** authentication rule.
Click **Save**. The rule is added to *Support authentication levels*.
{% endstep %}
{% step %}
### Save the protected URL
Select the URL that needs protection. For example, to protect the entire Webconsole portal:
* Find `/webconsole/*` in URL patterns and click **Edit**.
* Scroll down to the **Support authentication levels** section.
Click **Save** on the content provider page to finish the configuration. Now, when a user opens the Webconsole, OpenIAM prompts for OTP.
The Webconsole is now protected by the TOTP authentication rule. To protect another URL, repeat the same steps for that URL pattern.
{% endstep %}
{% step %}
### Test the MFA configuration
Sign out of the **Webconsole**. Then sign back in as a user and confirm that the MFA prompt appears and that the selected method works as expected.
In this example, when the user opens `/webconsole/about`, OpenIAM displays the OTP selector with two options:
* Call to +1\*\*\*\*
* Test to +1\*\*\*\*

If only one OTP provider is enabled in **Authentication Providers**, the dropdown is not shown. OpenIAM sends the OTP directly with the single configured provider.
{% endstep %}
{% endstepper %}
### Linking an authentication provider to a content provider
For MFA to work correctly, link the relevant authentication provider to a content provider.
{% stepper %}
{% step %}
### Open the content provider
Go to **Access Control → Content providers**. Select the content provider you want to update. If only one exists, select the default content provider.
{% endstep %}
{% step %}
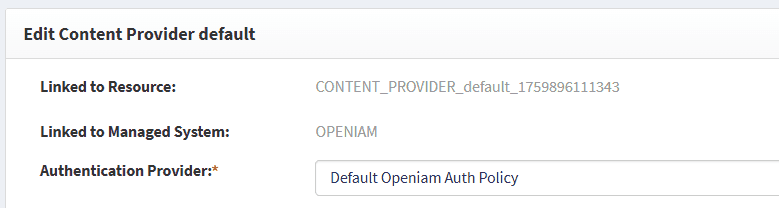
### Select the authentication provider
In the *Authentication provider* dropdown, select the provider you want to use, as shown below. Then click **Save**.
{% endstep %}
{% endstepper %}
The authentication provider is now linked to the content provider.
---
# Agent Instructions: Querying This Documentation
If you need additional information that is not directly available in this page, you can query the documentation dynamically by asking a question.
Perform an HTTP GET request on the current page URL with the `ask` query parameter:
```
GET https://docs-beta.openiam.com/configuring-multi-factor-authentication.md?ask=
```
The question should be specific, self-contained, and written in natural language.
The response will contain a direct answer to the question and relevant excerpts and sources from the documentation.
Use this mechanism when the answer is not explicitly present in the current page, you need clarification or additional context, or you want to retrieve related documentation sections.