# Requirements and installation
## Hardware Requirements
**Demo / test environments (minimum recommended):**
| Resource | Requirement |
| -------- | ----------- |
| CPU | 2 (v)CPU |
| RAM | 8 GB |
| Disk | 60 GB |
**Production environments (minimum required):**
| Resource | Requirement |
| -------- | ----------- |
| CPU | 4 (v)CPU |
| RAM | 16 GB |
| Disk | 100 GB |
{% hint style="info" %}
RAM usage peaks during synchronization. If you have 10,000+ objects in your managed system, 24 GB+ RAM is strongly recommended. Disk space is primarily consumed by logs in debug mode — monitor usage carefully or enable automatic log rotation during installation.
{% endhint %}
## Software Requirements
| Component | Requirement |
| -------------- | ----------- |
| .NET Framework | 4.8 |
| PowerShell | 5.1 |
PowerShell 5.1 is included by default on Windows Server 2016 and later. For older versions, check the installed version by running `$PSVersionTable` in PowerShell.
If you are unsure which .NET Framework version is installed, refer to [Microsoft's guide on determining installed .NET versions](https://docs.microsoft.com/en-us/dotnet/framework/migration-guide/how-to-determine-which-versions-are-installed).
## Additional dependencies
PowerShell connectors use an SQL CE 4.0 database to manage log records. During installation, the connector checks for this dependency and installs it automatically if not found.
***
## Before installing
Before starting installation you will need:
* The **hostname or IP address** of your RabbitMQ server (usually the same as the OpenIAM server address).
* The **connector queue name**.
To retrieve the queue name, log in to the OpenIAM Webconsole, go to **Provisioning → Connectors**, select your connector, and copy the **Connector Queue** value from that page.
***
## Installation
{% stepper %}
{% step %}
## Run the installer
Run the installer and click **Install**. The installer checks for the SQL CE 4.0 SP1 dependency and installs it automatically if missing.
{% endstep %}
{% step %}
## Choose the installation directory
When prompted, choose the **installation directory**. The default is `C:\Connectors\ConnectorName`. You may override this. Optionally enable end-to-end connection to the managed system at this step.
{% endstep %}
{% step %}
## Configure log settings
Configure **log settings**. For a first installation, enabling debug mode is recommended so you can trace requests from OpenIAM. In debug mode, log volume grows significantly — enable **Remove old logs** to automatically rotate log files and avoid disk exhaustion.
{% endstep %}
{% step %}
## Configure the RabbitMQ connection
After clicking `Next` you will be asked to configure the RabbitMQ connection to your OpenIAM instance.
| Field | Description |
| -------------- | ------------------------------------------------------------------------------------------------------------------------------------------------------- |
| Connector name | Human-readable identifier for this connector instance. No whitespace allowed — it will be used in process names. |
| RabbitMQ host | Hostname or IP address of your OpenIAM instance. |
| Username | RabbitMQ connection username. Default: `openiam`. |
| Password | RabbitMQ connection password. Default: `Password#51` (usually changed after initial setup). |
| Queue | Connector queue name copied from the OpenIAM Webconsole. |
| Port | Default: `5672`. Ensure this port is open on the OpenIAM instance. For Docker installations, verify the port is reachable inside the container as well. |
| Virtual host | Default: `openiam_connector`. |
{% endstep %}
{% step %}
## Test the connection
Click **Test connection** to verify the RabbitMQ address, port, username, and password. Note that this test only validates the connection to RabbitMQ itself — it does not verify the queue name. An incorrect queue name is a common installation mistake.
{% endstep %}
{% step %}
## Complete the installation
Click **Install** to complete the installation.
{% endstep %}
{% endstepper %}
***
## Updating connector
PowerShell connectors are updated using the reinstallation process. Following steps are used to update connectors that do not have customizations.
1. Backup your connector folder (you can compress and/or copy it to a safe location).
2. Uninstall the current connector.
3. Remove the connector folder.
4. Install the new connector using the same connection parameters that you specified during the previous installation.
In case you have some customizations, you should check the connector version before updating. If your major version (first two numbers) are the same, most likely you can just use the same script files that you used before.
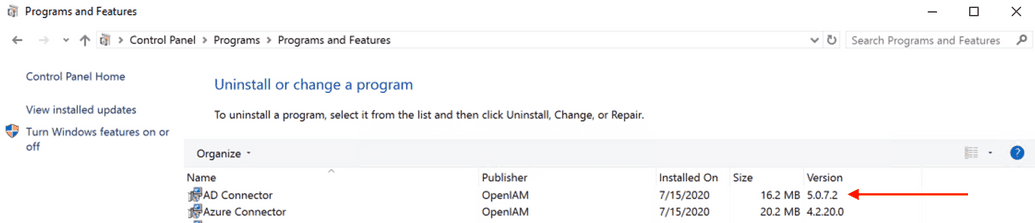
To check the connector version, you should go to **Control panel** **→ Uninstall a program**. You will see the connector version at the same line where you see the connector as shown in the image below.
If you have any customizations in the connector, you can first extract PowerShell files of the new connector (you can also use a test VM for the purpose of testing) and in case you made customizations yourself you can compare it with the new version. If the OpenIAM team has made customizations for you, you can contact OpenIAM support in case you are not sure.
***
## Multiple Connectors and load balancing
Multiple different PowerShell connector types can run on the same server (for example, AD and Office 365 simultaneously).
Two connectors of the **same type** cannot be installed on the same machine by default.
For **load balancing**, install two or more connectors of the same type on different servers using identical configuration settings. Requests will be distributed between them at runtime.
***
## RabbitMQ queue type
Starting from OpenIAM version 4.2.1.9, OpenIAM uses the **quorum** QueueType for RabbitMQ communication with connectors.
.NET/PS connectors use quorum by default from version 5.31.0.0 onwards. If you need to use a connector of version 5.31.0.0 or higher with an OpenIAM version below 4.2.1.9, open `Connector.config` in the connector folder and change the `QueueType` parameter from `quorum` to `classic`.
{% hint style="info" %}
**Troubleshooting tip:** Verify that the `QueueType` value in `Connector.config` matches the queue type configured on the RabbitMQ server side.
{% endhint %}
---
# Agent Instructions: Querying This Documentation
If you need additional information that is not directly available in this page, you can query the documentation dynamically by asking a question.
Perform an HTTP GET request on the current page URL with the `ask` query parameter:
```
GET https://docs-beta.openiam.com/application-onboarding/connectors/active-directory-powershell-connector/requirements-and-installation.md?ask=
```
The question should be specific, self-contained, and written in natural language.
The response will contain a direct answer to the question and relevant excerpts and sources from the documentation.
Use this mechanism when the answer is not explicitly present in the current page, you need clarification or additional context, or you want to retrieve related documentation sections.